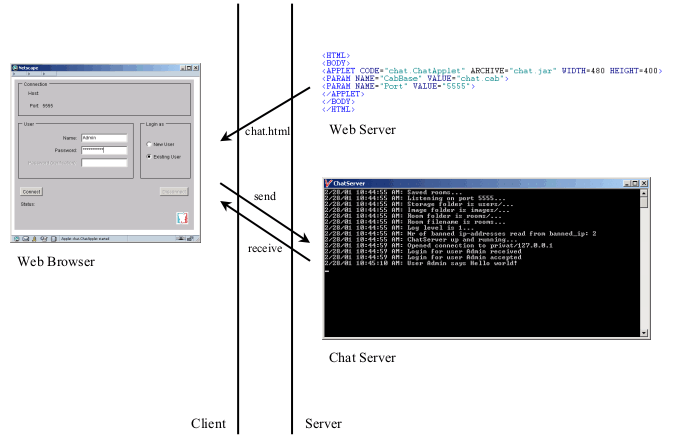
There are two different possibilities how to include Visual Chat on your own website.
(I) Including the Visual Chat Applet in your HTML Code
The easiest way is to include the following HTML paragraph in your page. Simply copy and paste it into your HTML code.
You can change the value of the parameter "Room" from "Lobby" to any other existing room name, thus redirect your visitors directly to your own forum.
<TABLE align="center" border="5" cellpadding="0" cellspacing="0">
  <TR>
    <TD>
      <APPLET CODE="chat.ChatApplet" ARCHIVE="http://visualchat.weirdoz.org/chat.jar" CODEBASE="http://visualchat.weirdoz.org" WIDTH=480 HEIGHT=400>
        <PARAM NAME="CabBase" VALUE="http://visualchat.weirdoz.org/chat.cab">
        <PARAM NAME="Port" VALUE="5555">
        <PARAM NAME="Room" VALUE="Lobby">
        <PARAM NAME="DemoMode" VALUE="FALSE">
      </APPLET>
    </TD>
  </TR>
</TABLE>
Please consider that this means you share the Visual Chat Applet from www.weirdoz.org with other people.
(II) Installing the Visual Chat Server and Applet on your Server
This approach is recommended if you want to set up your own Visual Chat Server.
Installing and running the Visual Chat Server components on your host requires the right to execute a Java program on your server - either through local access or using a remote shell like Telnet or SSH, plus X11 in case the server is a Unix machine. Please contact your system administrator in case of any doubts.

Important: Most internet service providers will not provide this as part of their regular homepage hosting package, but offer Private Java VMs in an extended package.
A Java runtime environment is a prerequisite for Chat Server installation. This runtime is either included in the Visual Chat Server Installer, resp. comes already shipped with most common operating system, or can be downloaded from these sites:
The Visual Chat Server Installation Wizard comes with a graphical user interface. Install Visual Chat Server on your WebServer by running install.exe (resp. install.bin). If you only have Telnet or SSH access on your WebServer host (hence no possibility to start graphical applications), you might want to download the ZIP-Version. In this case, simply unzip the file VisualChat.zip.
In case you want to pass some commandline arguments, here is the exact syntax for running the ChatServer-executable:
ChatServer [ port [ serverkey ] ]
e.g.
[~]$ cd VisualChat
[~/VisualChat]$ ChatServer 5555 MyServerkey
The port must fit with the port provided to the Client applet over a HTML Applet-parameter (see webserver/chat.html). The Serverkey is used to protect the Administration applet from unauthorized access. If no Serverkey is provided, it is set to "Admin".
If you downloaded the ZIP-File Chat Server Version, you will have to enter the following command from your commandline shell:
java -cp server.jar chat.ChatServer [ port [ serverkey ] ]
This has to be done from the chatserver-subfolder (created during installation), e.g.
[~]$ cd VisualChat/chatserver
[~/VisualChat/chatserver]$ java -cp server.jar chat.ChatServer 5555 MyServerkey
8/1/98 11:01:13 PM: Listening on port 5555...
8/1/98 11:01:13 PM: Storage folder is users/...
8/1/98 11:01:13 PM: Image folder is images/...
8/1/98 11:01:13 PM: Room folder is rooms/...
8/1/98 11:01:13 PM: Room filename is rooms...
8/1/98 11:01:13 PM: Log level is 1...
8/1/98 11:01:13 PM: Nr of banned ip-addresses read from banned_ip: 1
8/1/98 11:01:13 PM: ChatServer up and running...
The ZIP-File Version also contains sample start scripts for Windows (chatserver/startchat.bat) and Unix (chatserver/startchat.sh).
Under Unix you should consider that
Go sure that the Client applet is downloaded via HTTP - go sure that the browser's address field conatins something like
http://<your_server_name>/VisualChat/chat.html
Don't run it over a file-codebase like
file://c|/VisualChat/webserver/chat.html
otherwise some browsers won't allow to connect to the ChatServer (MSIE won't, Netscape will though). You should now be able to log in.
When starting up for the first time, the Chat Server will create a user named "Admin" with password "Admin" (unless a Serverkey was provided as a commandline argument when starting the Chat Server for the first time. In this case, the Serverkey will also serve as the "Admin"-user's password). You should change this password as soon as possible by logging in as "Admin", clicking the User-tab, entering a new password and hiting the "Apply" button.
You can also delete the Admin user at any time by erasing the file users/Admin. A new Admin user will then be created when starting the Chat Server for the next time. The Administration applet located at admin/admin.html can be used for remote server administration.
Certain Clients can be prohibited from using Visual Chat. This is done by storing banned ip-addresses (one per line) in a file named "banned_ip" within the chatserver-folder. A sample "banned_ip"-file comes with the Server Installation.